Running events is one of the most effective ways to build a community, promote your brand, and engage your audience. From local workshops to online webinars and conferences, selling tickets directly on your WooCommerce website gives you full control over event management, payments, and attendee tracking.
In this guide, you’ll learn how to sell tickets and manage events on a WooCommerce-powered WordPress website using The Events Calendar and Event Tickets & RSVPs plugins. These two tools transform a standard WooCommerce store into a complete event management system that makes it easy to create, promote, and sell event tickets.
By the end of this article, you’ll know how to:
- Create events with detailed schedules and venues
- Sell tickets through the WooCommerce checkout
- Manage RSVPs, attendees, and ticket inventory
- Improve conversions and user experience for event bookings
Next, let’s look at why WooCommerce is an ideal choice for selling tickets online.
Why WooCommerce Is the Best Foundation for Ticket Sales
WooCommerce is more than just an eCommerce plugin. It’s a flexible system that lets you sell anything online, including digital downloads, memberships, and event tickets. The real advantage comes from its deep integration with WordPress, giving you complete control over your website and customer experience.
When it comes to event ticketing, WooCommerce offers several benefits that make it a perfect starting point:
1. Familiar checkout experience
Visitors already know the WooCommerce checkout process. This makes buying event tickets quick and intuitive, helping you reduce cart abandonment.
2. Secure and reliable payments
WooCommerce supports major payment gateways like Stripe, PayPal, and Apple Pay. You can collect payments instantly while keeping transactions secure with SSL encryption.
3. Easy event and ticket management
Each ticket can be treated as a WooCommerce product. You can set pricing, manage stock, offer variations like VIP or group tickets, and track attendee numbers in real time.
4. Full control over data
Unlike third-party ticketing platforms, your customer and attendee data stays on your own website. You own your audience and can build lasting relationships through email marketing or loyalty campaigns.
5. Extensible with add-ons
WooCommerce integrates seamlessly with plugins like The Events Calendar and Event Tickets, allowing you to manage everything from scheduling to RSVPs and ticket scanning in one dashboard.
WooCommerce gives you everything you need to create a professional event ticketing system that grows with your business.
Next, we’ll look at the tools you’ll need to start selling event tickets on your WordPress site.
The Plugins You Need: The Events Calendar and Event Tickets & RSVPs
To turn your WooCommerce website into a complete event management and ticketing system, you’ll need two key plugins from StellarWP, The Events Calendar and Event Tickets & RSVPs. Together, these plugins make it easy to organize events, sell tickets, and manage attendees without relying on third-party platforms.
Let’s break down what each one does and how they work together.
The Events Calendar
The Events Calendar is one of the most popular event management plugins for WordPress. It’s used by universities, venues, and organizations that need a reliable way to showcase upcoming events.
With the free version, you can:
- Create and display events using a clean, modern calendar layout.
- Add event details such as dates, times, venues, organizers, and categories.
- Use shortcodes and blocks to embed event listings anywhere on your website.
- Filter events by type, location, or tags to help visitors find what they need quickly.
For growing businesses or recurring events, the Pro version adds advanced features such as recurring events, additional calendar views, and detailed organizer management.
Get 15% Off Using The Promo Code Below
EVENTS15
Event Tickets & RSVPs
Event Tickets works hand-in-hand with The Events Calendar to bring ticketing and registration to your WordPress site. You can sell paid tickets, collect RSVPs, or offer free event registrations — all directly from your website.
Key features include:
- Create unlimited ticket types (e.g., general admission, VIP, early bird).
- Connect each ticket type with a WooCommerce product for secure payment processing.
- Enable attendee registration and manage lists inside your WordPress dashboard.
- Generate and send QR-coded tickets to simplify check-ins at events.
- Combine with Event Tickets Plus to unlock advanced features such as attendee collection fields, custom registration forms, and stock management per ticket type.
These two plugins integrate nicely with WooCommerce, so you can sell tickets the same way you sell any other product, with full control over pricing, inventory, and checkout experience.
Next, we’ll move on to setting up your event ticketing system step-by-step, starting with installing and activating these plugins on your WordPress site.
Step-by-Step Guide to Selling Event Tickets in WooCommerce
This is the practical part where your website starts working as an event platform. The process is simple once you have WooCommerce, The Events Calendar, and Event Tickets installed. Here’s how to set everything up from start to finish.
Step 1: Install and Activate the Required Plugins
You will need these three plugins:
- WooCommerce – handles payments and checkout.
- The Events Calendar – creates and displays your events.
- Event Tickets – adds ticketing and RSVP options to each event.
To install them:
- Open your WordPress dashboard.
- Go to Plugins → Add New.
- Search for each plugin, click Install Now, and then Activate.
- Once active, you will see new menu items like Events and Tickets in your dashboard.
Step 2: Configure WooCommerce Settings
Before creating tickets, make sure your WooCommerce setup is complete.
- Go to WooCommerce → Settings and review your currency, payment methods, and checkout page.
- Set up email notifications so your buyers automatically receive ticket confirmations.
- If you plan to sell multiple ticket types, enable inventory management under Products → Inventory.
These basic settings help WooCommerce process payments and manage stock for your tickets.
Step 3: Create Your First Event
Once WooCommerce is ready, it’s time to create your first event.
- Go to Events → Add New.
- Add an event title, description, date, time, and location.
- Upload a featured image and, if needed, assign an organizer and venue.
When your event details look complete, click Publish.
Step 4: Add Tickets to the Event
The next step is adding tickets to the event you just created.
- Open the event and scroll down to the Tickets section.
- Click Add New Ticket.
- Add a ticket name, price, and quantity available.
- Set the sales start and end dates.
- Optionally, add a short description like “Includes lunch and workshop access.”
- Save your ticket.
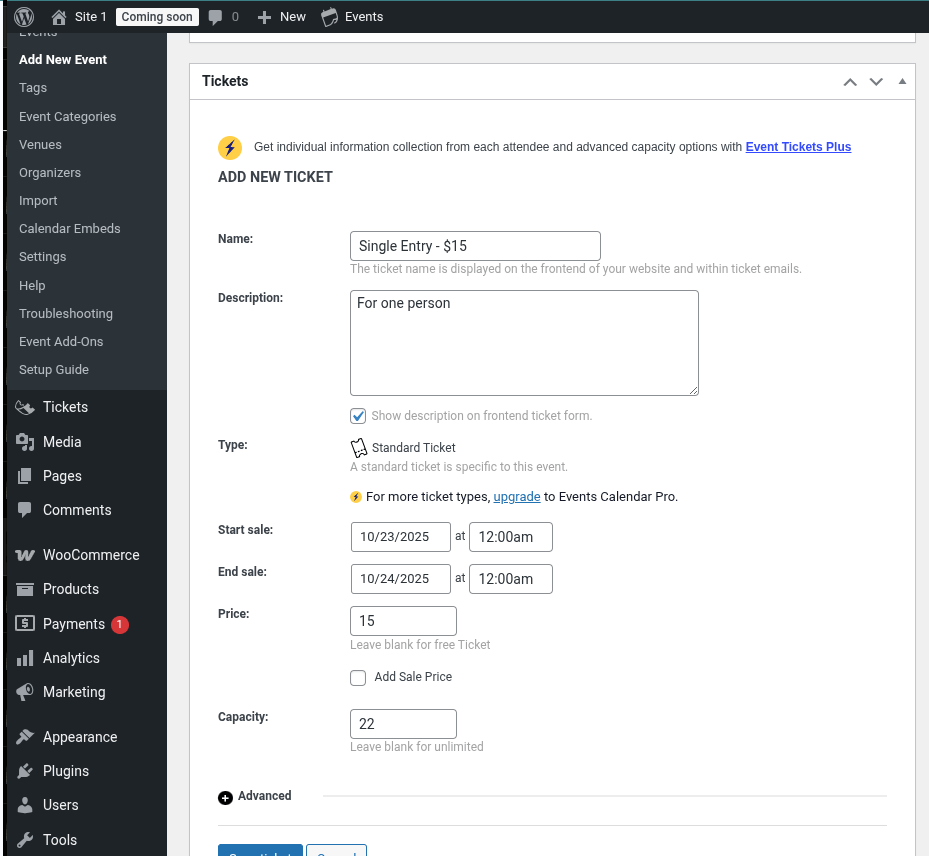
Once saved, the ticket will automatically appear in your WooCommerce products.
If you are using Event Tickets Plus, you can also:
- Add custom attendee fields like name, email, or phone number.
- Offer multiple ticket types such as Early Bird or VIP.
- Track attendance for each event directly from your dashboard.
Step 5: Preview and Test Your Setup
Visit your event page and make sure the ticket section appears.
Click Add to Cart and complete a test checkout using WooCommerce’s test mode or the Sandbox option for your payment gateway.
Confirm that:
- The purchase works correctly.
- The buyer receives a confirmation email.
- The order appears under WooCommerce → Orders.
This test helps confirm that everything is linked properly before you start selling.
Step 6: Manage Attendees and Check-ins
When attendees start buying tickets, you can manage them easily from your dashboard.
- Go to Events → Attendees to see a full list of participants.
- Export the list if you need to print it or use it for check-ins.
- If you have Event Tickets Plus, use the QR code check-in feature to scan tickets at the event entrance.
This makes it simple to manage large events without switching between tools or spreadsheets.
How to Customize Ticket Pages and Improve User Experience
Once your ticketing system is active, the next step is to make sure visitors find it easy to explore events and complete purchases. A clear layout and fast checkout directly affect how many tickets you sell. Here’s how to customize your ticket pages and improve user experience.
Customize the Event Page Layout
The Events Calendar plugin creates a default layout for your event pages, but you can adjust it to match your website design.
- Go to Events → Settings → Display.
- Choose your preferred template style (default, full width, or theme template).
- Use shortcodes like [tribe_events] or Gutenberg blocks to embed calendars or specific event lists on any page.
If you use Elementor or Block Editor, you can drag and drop event widgets to create a cleaner layout. Keep your most important details, like event name, date, and ticket button, visible without scrolling.
Style Ticket Sections with Custom CSS
For a more branded look, use your theme’s customizer or a CSS plugin to style ticket buttons and pricing sections.
Here are a few simple CSS examples you can try:
.tribe-tickets__rsvp-title,
.tribe-tickets__tickets-title {
font-size: 1.4rem;
font-weight: 600;
color: #222;
}
.tribe-common-c-btn {
background-color: #0073aa;
color: #fff;
border-radius: 6px;
padding: 10px 18px;
}
Small visual adjustments like button color, padding, and font size help your ticket section stand out and look more professional.
Add a Countdown Timer or Urgency Message
Adding a countdown timer for upcoming events or a limited number of tickets can increase conversions. You can use plugins such as Countdown Timer Ultimate or WP Date Countdown to show urgency messages like “10 seats left” or “Early Bird Sale ends soon.”
Place the timer near the ticket purchase button to grab users attention.
Simplify the Checkout Process
The default WooCommerce checkout form can sometimes feel long for event buyers. You can improve it by:
- Removing unnecessary fields using the Checkout Field Editor plugin.
- Offering guest checkout to skip account creation.
- Adding express payment options like Apple Pay or Google Pay.
A short, simple checkout form reduces drop-offs and helps users complete their ticket purchases faster.
Enhance Navigation Between Events
If your website lists multiple events, make it easier for visitors to find and compare them.
You can:
- Enable filter views from Events Calendar Pro so users can sort by date, category, or location.
- Add a search bar to the top of your events page.
- Include “Back to All Events” buttons for easy navigation.
These small adjustments make a big difference for repeat visitors and larger event catalogs.
Add Social Sharing and Calendar Integration
Allow users to share events directly to platforms like Facebook, X (Twitter), or LinkedIn. The Events Calendar includes built-in sharing options, but you can also use plugins like AddToAny for more control.
If you use Event Tickets Plus, enable “Add to Calendar” buttons so attendees can save the event to Google Calendar, iCal, or Outlook. This helps improve attendance and keeps users reminded.
With these tweaks, your ticket pages will look polished, load faster, and create a better experience for attendees. The next step is to learn how to automate confirmations, email reminders, and attendee management to save time and stay organized.
Automate Event Confirmations and Attendee Management
After setting up your ticketing system, automation is what keeps your events running smoothly. Manual confirmations and attendee tracking can quickly become overwhelming, especially as your sales grow. The good news is that both The Events Calendar and Event Tickets plugins include built-in automation features that make this process easy.
Send Automatic Email Confirmations
Once someone purchases a ticket or submits an RSVP, they’ll receive an automatic confirmation email from your WordPress site. You can customize this message by going to:
Events → Settings → Emails.
Here, you can edit:
- The subject line and message body
- Your logo and brand name
- Ticket details, event date, and order information
If you’re using WooCommerce, the confirmation will also appear under WooCommerce → Settings → Emails, where you can further customize the template or add your own HTML design.
For better deliverability, use an SMTP plugin such as Post SMTP to ensure confirmation emails land in your users’ inbox instead of spam.
Set Up Automated Reminders Before Events
You can send reminder emails to attendees one or two days before the event. Event Tickets Plus supports integration with Mailchimp and HubSpot, making it easy to send reminders automatically based on the event date.
Reminders can include details like:
- Event start time and location
- Zoom or Google Meet links (for virtual events)
- Parking or venue details
Adding a friendly reminder helps reduce no-shows and builds trust with your attendees.
Manage RSVPs and Attendee Lists
If you’re hosting free events or workshops, RSVPs are a convenient option. You can view and manage RSVPs directly under:
Events → Attendees.
From there, you can:
- View who’s attending each event
- Export attendee data to CSV
- Manually check in attendees during the event
For paid tickets, you’ll find all the details in your WooCommerce Orders section. Each order includes attendee information, ticket type, and payment status.
Check In Attendees On-Site
Event Tickets Plus offers a built-in check-in feature that works from your phone or tablet. You can scan QR codes from tickets using the Event Tickets Plus App or a third-party barcode scanner.
This makes event management faster and prevents duplicate entries. For smaller events, you can manually mark attendees as “Checked In” from the dashboard.
Use Automations to Send Post-Event Follow-Ups
After the event, sending a quick thank-you note or feedback request helps keep attendees engaged. You can:
- Send follow-up emails through Mailchimp or FluentCRM.
- Offer a discount for your next event.
- Share event highlights, recordings, or photo galleries.
Automating this process keeps your community active and encourages repeat attendance.
Integrate with Third-Party Tools
If you want deeper automation, connect The Events Calendar and Event Tickets with tools like Bit Integrations. These tools can trigger custom workflows such as:
- Adding new attendees to a Google Sheet
- Sending data to Slack or Discord
- Creating CRM records in HubSpot or ActiveCampaign
These small automations can save hours of manual work and improve your team’s workflow.
By automating confirmations and attendee management, you ensure that your event runs efficiently from ticket purchase to post-event engagement. In the next section, we’ll look at how to analyze your event performance and use the data to improve future events.
Track Sales and Analyze Event Performance
Once your events are live and tickets start selling, tracking performance becomes just as important as promotion. The Events Calendar and WooCommerce give you several ways to monitor sales, attendance, and engagement.
Understanding what works best helps you make smarter decisions for your next event, refine pricing, and optimize marketing.
View Ticket Sales in WooCommerce
If you’re selling tickets through WooCommerce, you can find all purchase details under:
WooCommerce → Orders.
Each order shows:
- The event name
- Ticket type and quantity
- Buyer details
- Payment status
For a complete overview, go to WooCommerce → Reports → Orders. Here, you can see total sales, revenue trends, and which events generated the most income.
This data helps you identify your most profitable event types or time periods for ticket sales.
Monitor RSVPs and Attendance
Free events often rely on RSVPs to gauge attendance. You can access RSVP data from:
Events → Attendees.
From this page, you can:
- Export RSVP lists for reporting
- See who confirmed attendance
- Track check-ins for in-person events
This is especially helpful if you’re managing workshops, community events, or meetups that don’t require payments but still need headcounts.
Use The Events Calendar Reports
The Events Calendar includes its own Reports tab that summarizes overall activity. You’ll see total events created, tickets sold, RSVPs received, and trends across multiple months.
If you’re using Event Tickets Plus, the data becomes even more detailed. You can filter by event, date range, or ticket type to understand how each event performed individually.
Connect with Google Analytics and Tag Manager
For deeper insights, integrate your WordPress site with Google Analytics 4 and Google Tag Manager.
You can track:
- Conversions for completed ticket purchases
- Abandoned checkouts
- Traffic sources that drive the most sales
This helps you focus your marketing budget on channels that deliver results, such as social media ads, newsletters, or affiliate partnerships.
If you’re using WooCommerce, tools like MonsterInsights make it easy to connect Google Analytics without needing custom code.
Track Event ROI
Your event’s success is more than just ticket sales. Consider other performance indicators such as:
- Average ticket revenue
- Attendance rate versus registrations
- Repeat customer rate
- Conversion rate from event page visits
These numbers tell a bigger story about engagement and marketing effectiveness.
Export Data for Accounting and Marketing
At the end of each event cycle, export your sales and attendee data to CSV or Excel. This data can be shared with your finance or marketing team to:
- Reconcile payments
- Measure campaign performance
- Segment users for retargeting campaign
You can also upload attendee lists into email tools like NextCRM or FluentCRM to keep communication going.
By combining WooCommerce analytics, The Events Calendar reports, and marketing insights from Google Analytics, you get a complete view of your event’s performance. Tracking this data consistently helps you understand your audience better and improve future events.
Recommended Hosting for Running Events on WordPress
Running an events website that sells tickets requires more than a good plugin setup. Your hosting environment directly impacts site performance, checkout speed, and visitor experience. A slow or unstable site can lead to abandoned purchases and missed opportunities.
To make sure your event website performs well during traffic spikes, you need a hosting platform that offers a balance of speed, security, and scalability. Below are a few reliable hosting providers that work exceptionally well for WordPress sites running The Events Calendar and WooCommerce.
HostWP.io
HostWP.io provides Managed WordPress Hosting built on LiteSpeed Enterprise, optimized for speed and caching efficiency. It includes advanced performance configurations, daily backups, free SSL, and real human support. If you are using The Events Calendar with Event Tickets, this setup ensures smooth performance even when event pages receive high visitor traffic.
HostWP.io also offers affordable plans suitable for both small event organizers and large-scale enterprise projects.
Pressidium
Pressidium is a managed hosting platform built for performance and reliability. Their architecture uses load-balanced clusters, which helps maintain consistent uptime during heavy traffic surges. Pressidium’s staging and deployment tools are excellent for agencies or teams running multiple event sites that need version control and testing environments.
ScalaHosting
ScalaHosting combines performance with flexibility. Their managed WordPress plans include SPanel, custom security rules, and dedicated resources. This makes it easier to host event websites that include ticket sales, media galleries, and recurring updates. ScalaHosting also provides real-time monitoring and optimization tools to keep your site stable during ticket launches.
When hosting an event or ticketing site, look for:
- SSD or NVMe storage for faster database operations
- HTTP/3 and LiteSpeed cache for quick page loads
- Daily backups and malware protection
- 24/7 technical support
- Server-level caching and CDN integration
These factors help your website handle ticket sales efficiently, process transactions quickly, and maintain reliability as your audience grows.
Final Thoughts: Build and Grow Your Events with WordPress
The Events Calendar and Event Tickets plugins make it incredibly easy to manage events, collect RSVPs, and sell tickets directly from your WooCommerce store. They give you the flexibility to create simple events or complex schedules, all within the WordPress dashboard you already use.
If you’re an event organizer, business owner, or creative professional, these plugins help you stay in full control of your schedule and sales without relying on third-party platforms. You can track registrations, manage attendees, and even add paid ticketing with WooCommerce, all in one place.
When paired with reliable hosting like HostWP.io, Pressidium, or ScalaHosting, your event pages load faster, checkout remains smooth, and you’re ready to handle large traffic spikes during promotions or ticket launches.Tip: Start with the free versions of both plugins to explore the features, then upgrade to unlock advanced event management tools when you’re ready to scale.
